
A delicious and well-known South Indian dish called rava idli has become quite popular not only in India but also throughout the world. Semolina (rava) is used in place of rice to make this version of the traditional idli, a steamed rice and lentil cake. This delicious dish has the ideal balance of flavours and textures, making it a popular choice for breakfast or a snack for many. Whether you’re a seasoned chef or a culinary novice, this simple rava idli recipe will show you how to make delectable idlis in the comfort of your own home.
Rava Idli
What’s up guys you are Welcome to my blog Today I’m making Instant Rawa Idli. It’s a perfect breakfast recipe. Whenever making Idli, you need to soak the rice & lentils for 5-6 hours & then grind the batter & ferment it. Although the idli turns out amazing, it can take a lot of time too.
If someday you feel like having Idli but you don’t have the batter at hand. so for this Idli, it takes just 10-15 minutes to make the batter. Rest it for 20-30 minutes & the Idlis will be ready. & the resultant Idlis are really soft, fluffy, spongy, & is really tasty too.
& I’m sharing a quick coconut chutney recipe, where I add some mint leaves. It is a very delicious chutney. When I tried this Rawa Idli recipe in Bengaluru, then it was served with this coconut chutney, It has some green chillies, some mint leaves & this combination is very delicious. Otherwise you can enjoy it with regular chutney, tomato onion chutney, or sambhar. This chutney gets made quickly & even Rava idlis get made quickly.
Prep time: 40-45 minutes Cooking time: 12-15 minutes Serves: 4-5 people
Ingredients: Rava Idli
- OIL 1 TBSP
- MUSTARD SEEDS 1 TSP
- CHANA DAL 1 TSP
- URAD DAL 1 TSP
- GINGER 1 TSP (CHOPPED)
- GREEN CHILLI 2 NOS. (CHOPPED)
- CASHEW 2 TBSP (ROUGHLY CHOPPED)
- CURRY LEAVES 10-12 NOS. (CHOPPED)
- ASAFOETIDA 1/4 TSP
- JADA RAVA 1 CUP
- CURD 1 CUP
- FRESH CORIANDER A SMALL HANDFUL (CHOPPED)
- SALT TO TASTE
- WATER 1/3 CUP
- WATER AS REQUIRED (TO ADJUST CONSISTENCY)
- BAKING SODA 1/2 TSP
- Coconut Chutney
- COCONUT 1 CUP (PACKED)
- ROASTED CHANA DAL 1/2 CUP
- FRESH CORIANDER A SMAL HANDFUL
- MINT 10-15 LEAVES
- TAMARIND A MARBLE SIZED
- BALL GREEN CHILLI 2 NOS.
- BLACK PEPPER POWDER A PINCH
- CUMIN SEEDS 1/2 TSP
- SALT TO TASTE
- WATER AS REQUIRED
- Tempering
- OIL | तेल 1 TBSP
- CHANA DAL 1/2 TSP
- URAD DAL 1/2 TSP
- MUSTARD SEEDS 1/2TSP
- CURRY LEAVES 8-10 NOS.
- RED CHILLI 3 NOS.
What Is Rava Idli?
A well-liked South Indian dish is rava idli, sometimes referred to as semolina idli. A steamed rice and lentil cake, the classic idli is modified by this dish. Semolina, sometimes referred to as rava or sooji, is used as the major component in rava idli in place of rice and lentils.
Semolina (rava), yoghurt, baking soda or Eno fruit salt (a leavening agent), oil, mustard seeds, curry leaves, sliced carrots, chopped cilantro (coriander leaves), and spices like cumin seeds, grated ginger, and green chilies are the essential components required to make instant rava idli. To improve its flavour, the semolina is often dry-roasted before being combined with additional ingredients.
To make raba idli, yoghurt is combined with semolina, which is then given some time to absorb the liquid and soften before being used. Oil is heated while mustard seeds, cumin seeds, curry leaves, chopped ginger, and green chilies are added to create a tempering, or tadka. The semolina mixture is then combined with this tempering, grated carrots, chopped cilantro, and salt. After thoroughly combining the batter, the flavours are allowed to mingle for a further few minutes.
How To Make Rava Idli
First of all let’s learn how to make the batter for this Instant Rawa Idli.
How To Make Instant Idli Batter
Heat a pan on high flame, Once the pan is hot, then add 1 tbsp oil to it. Once the oil is hot, then to it add 1 tsp mustard seeds, 1 tsp chana dal, & add 1 tsp urad dal, & lightly roast the lentils on low flame. Within 1-2 minutes, you will see that the lentils will start browning a little bit.
At this stage, to this add 1 tsp chopped ginger, 2 green chillies chopped, 2 tbsp roughly chopped cashews, 10-12 chopped curry leaves, & add 1/4th tsp asafoetida & stir it. Now, I’m adding 1 cup of semolina here. For the variety of semolina used, try to use the thicker semolina or the one used to make Upma.
After adding the semolina, mix it well & roast it on medium low flame for 2-3 minutes. The colour of semolina shouldn’t change. The semolina should just cook & puff up a little bit. after 2-3 minutes, the semolina is puffed up & cooked. Cook only this much.
Once you have cooked the semolina upto this stage, then take it out in a bowl & let it cool down. Once the mixture is cooled down, then add equal quantity of curd to the semolina. So whisk 1 cup curd nicely & add it. Try that the curd is slightly sour so that it mimics the sourness of the fermented idli. then add chopped coriander leaves, & add salt to taste,
Now using a whisk, nicely mix it well to avoid any lumps forming in semolina. Once mixed, then I’m adding water to adjust the consistency. So, I’ve taken about 1/3rd cup of water here & slowly you have to add water & mix. Don’t worry even if your batter is looking thin as of now as the semolina has a tendency of soaking water.
So the batter will automatically thicken after resting. Now I’ve prepared a semi-thin batter here. Let this batter rest for a minimum of 15-20 minutes or even half an hour. so how easy it is to make the batter for Rawa Idli & it gets ready instantly.
Pro Tips
One thing that is very important here is that when you roast the semolina, it shouldn’t change colour, just fluff up. By roasting the semolina like this results in a really soft Rawa Idli, Cooking the semolina slightly here makes the Idli very fluffy. Second thing is that when you add water to make the batter, your batter should be semi-thin. It shouldn’t be too thick, as the semolina soaks a lot of water. So, if you make a thick batter, the semolina will not be able to soak enough & it might make a stiff batter. So keep that in mind. Don’t worry even if your batter becomes too thin, the semolina will soak it up.
When you rest it, you will see that the batter will thicken again, It could be possible that we may need to add more water at that stage to adjust. While the batter is resting,
How To Make Coconut Chutney
Let’s learn how to make the coconut chutney with mint & green chillies & is very tasty.
In a mixer grinder jar take 1/2 cup coconut, 1/2 cup roasted chana dal, a small handful of fresh coriander leaves, 12-15 mint leaves, a marble sized ball of tamarind, 2 green chillies, a pinch of black pepper powder, 1/4th tsp cumin seeds, salt to taste, & add some water & grind the chutney.
When making the coconut chutney, be careful not to mix the mixer grinder for too long, If the mixer grinder heats up then it can cause the oil to separate from the coconut. If you want you can add an ice cube while grinding the chutney. This is one tip.
You Can Also Read This Recipe
So I’ve ground the coconut chutney. And Transfer it into a bowl. Now, to temper this chutney, add 1 tbsp oil to a pan & heat it up. Now, to this add 1/4th tsp chana dal, & add 1/4th tsp urad dal, Toast it slightly. Then to this add 1/4th tsp mustard seeds, 6-8 curry leaves, & add 2-3 dried red chillies, stir it & immediately pour it on the chutney. Mix the tempering with the chutney & our coconut chutney is ready. This chutney is very delicious.
The addition of mint leaves gives a nice flavour. Try it once if you have never added mint before. & if you don’t want to add mint leaves, then you can skip them & make a normal chutney too.
Once you have made this chutney, cool it down a little bit before serving it. Or if you can’t cool it down then just add an ice cube to it.
Prepare Steamer & Idli Plates
Our batter has rested too. After resting period, but before checking the batter, I’m preparing the steamer here. Add water to the steamer & heat it up nicely. There should be enough steam
before we add the idlis to the steamer. If you add idli to a cold steamer & then wait for the steam to develop,
The shock or the spring action due to temperature difference will not be available & thus idli won’t be fluffy. It can result in a hard & dense idli. This is very important. Your steamer should be steaming hot. Only then will your idli be able to go in the steamer.
Steamer has heated up. Let’s check the batter now. the batter has thickened & the semolina has soaked enough water. I’m slightly going to adjust it’s consistency. Add a little bit of water to it.
I’ve added about 2 tbsp of water more here & mixed it well. It’s consistency should be exactly like the regular idli batter.
Now to this I’m adding 1/2 tsp baking soda, & adding some water to help the soda mix nicely.
How To make Rava-Idli
So our idli batter is ready
Steam Rava Idli
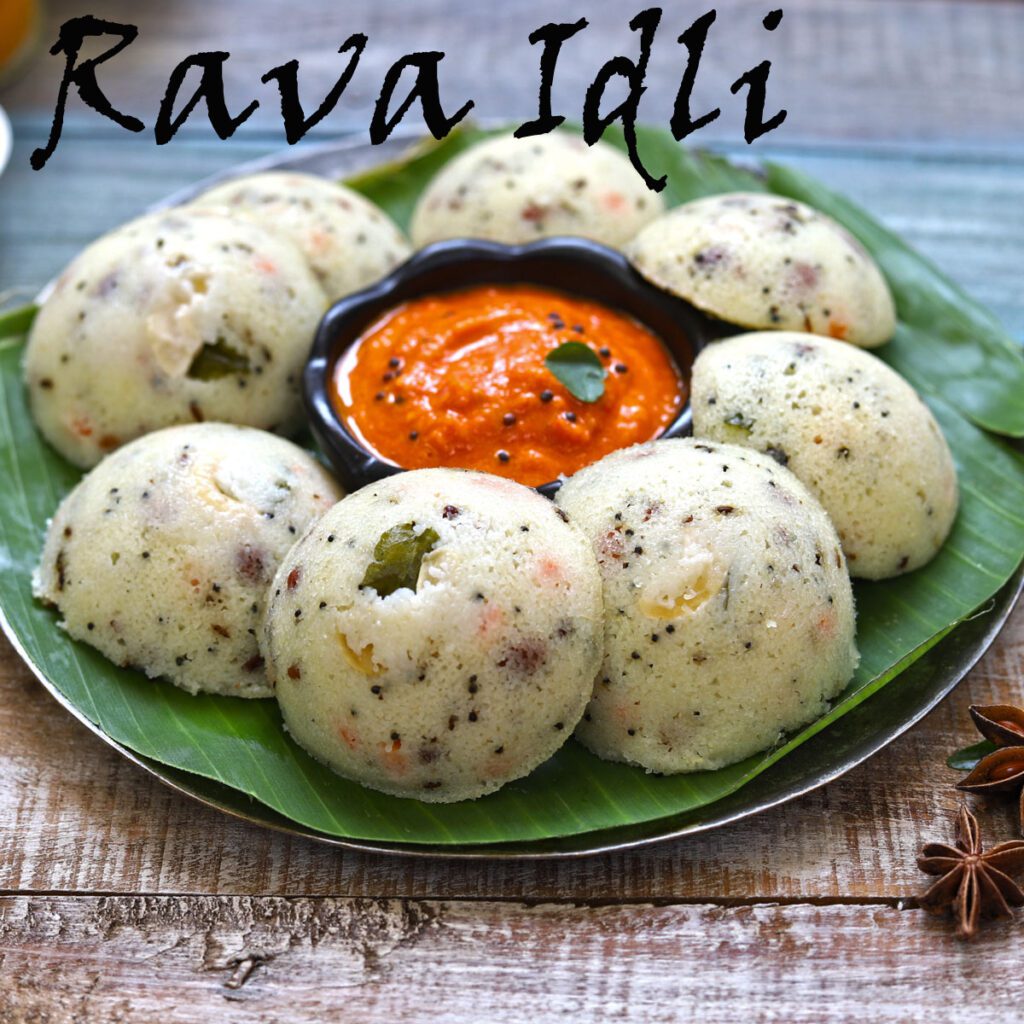
And our steamer is also ready now we will grease some oil in idli plate and batter transfer into them and cook this idli for 10 to fifteen miniuts or it will coock, and after 10 minutes check idli wiith tooth pick if idli batter not stic with toothpick than our rava idli is ready, Now we will remove this rava idlii and cool down, friends our rava idli is ready now serve this delicious rava idli with coconut chutney and sambhar and enjoy this rava idli.
So definitely try this rava idli in your kitchen and share this wonderful rava idli recipe with your friend and family and tell me in comments box how did you like this recipe,cheers
FAQs
Q: What is rava idli?
In place of the usual rice and lentil batter used to make ordinary idli, semolina (rava) is used to make the well-known South Indian dish known as rava idli. It is a wonderful, light, and fluffy savoury steamed cake.
Q: How is rava idli different from regular idli?
The batter makes the most impact. Semolina is used as the major ingredient in rava idli rather of rice and lentils. When compared to ordinary idli, this difference provides rava idli a slightly different texture and flavour. Since rava idli doesn’t need to be fermented like conventional idli, it may be made more quickly.
Q: Can I make rava idli without using yogurt?
A crucial component of rava idli is yoghurt since it gives the batter a tangy flavour and aids in gently fermenting the batter. However, you may use sour buttermilk or even a solution of lemon juice and water in place of yoghurt if you don’t have any on hand.
Q: Can I add vegetables to rava idli?
Yes, rava idli’s flavour and nutritional value can be improved by adding veggies. Green peas, cilantro, and grated carrots are typical veggies used in rava idli. They can be included in the batter before it is steamed.
Q: How long does it take to steam rava idlis?
Rava idlis typically take 12 to 15 minutes to steam. The size of the idli moulds and the heat’s intensity, however, can affect how long the food will take to cook. The best way to determine whether the idlis are done is to pierce them with a toothpick or knife. If it tests negative, they are prepared to be served.
Q: Can I make rava idlis in advance?
Yes, rava idlis can be prepared in advance. You may keep them in the refrigerator for up to two days after steaming and cooling them. Just make sure the container is airtight. You may reheat them in a steamer or microwave when you’re ready to serve.
Q: What are some popular accompaniments for rava idli?
Rava idlis are frequently served with sambar, a lentil-based vegetable stew, tomato chutney, mint chutney, and other flavorful chutneys. They are also frequently served with coconut chutney. They go well with a side of yoghurt or ghee as well.
Q: Can I make rava idlis without using baking soda?
The idlis’ light and fluffy texture is aided by baking soda. If you don’t have any baking soda, you can make a little amount of baking powder in its place. But the texture can be a little different.