
The renowned street food dish Ragda pattice was created in the Indian state of Maharashtra. It is a delicious combination of two primary ingredients: pattice, which are shallow-fried potato patties, and ragda, a fiery white pea curry. This mouthwatering treat is renowned for its potent flavours, luxurious texture, and eye-catching presentation. The word “ragda,” which is Hindi for the spiced curry made with dried white peas, is whence the dish gets its name. Following an overnight soak, these peas are cooked with a mixture of flavorful spices, including cumin, coriander, turmeric, and red chilli powder. The end product is a thick, gravy-like ragda that is sour and spicy.
In the second element, called pattice, mashed potatoes are combined with a variety of herbs, spices, and occasionally other vegetables. Round or oval-shaped patties of the potato mixture are shallow-fried until brown and crispy on the outside and soft and fluffy on the inside.
Ragda Patties
Prep time: 20-25 minutes Cooking time: 30-35 minutes Serves: 4-5 people
About Ragda Patties Recipe
What’s up guys you are Welcome to my new blog. Today, I’m sharing a Mumbai-street style chat recipe with you all I’m making ‘Ragda Pattice’, just like you’d find on streets of Mumbai Along with Ragda Pattice the “sweet chutney” that’s used in different chaat & the spicy green chutney, which is also used I’m sharing both these recipes too, with you guys It’s a really simple process, with simple ingredients First of all let’s make “Meethi chutney”
Sweet tamarind chutney Ingredients:
● Tamarind (imli) ½ cup / 75 grams
● Seedless dates (khajoor) 250 gm
● Jaggery 750 gm
● Salt to taste
● Black salt 1 tsp
● Ginger powder ½ tsp
● Kashmiri red chilli powder 1 tbsp
● Jeera powder 1 tbsp
● Black pepper a pinch
● Water 1 litre
Green chutney Ingredients:
● Hara dhaniya (coriander leaves) 1 cup (packed)
● Pudina (fresh mint leaves) ½ cup (packed)
● Adrak (ginger) 1 inch
● Teekhi hari mirchi (spicy green chillies) 2-3 nos.
● Roasted Chana dal 1 tbsp
● Kala namak (black salt) ½ tsp
● Jeera (cumin) powder 1 tsp
● Amchur (dry mango) powder 1 tsp
● Salt to taste
● Ice cubes 2-3 nos.
● Water as required
Ragda Ingredients:
• Safed matar (Dry White peas) 250 gm
• Water as required
• Haldi (Turmeric) powder ½ tsp
• Jeera (Cumin) powder ½ tsp
• Dhaniya (Coriander) powder ½ tsp
• Saunf (Fennel) powder ½ tsp
• Ginger 1 inch (julinned)
• Fresh coriander (chopped)
Aloo pattice Ingredients:
• Oil 1 tbsp
• Jeera 1 tsp
• Green chillies 1-2 nos. (chopped)
• Boiled Potatoes 5-6 medium size
• Salt to taste
• Fresh coriander a handful
• Ginger ½ inch
• Oil for cooking the tikki
Assembly:
• Crispy aloo pattice
• Ragda
• Methi chutney
• Green chutney
• Chaat masala
• Ginger julienned
• Chopped onions
• sev
How To Make Meethi Chutney
1. To a bowl, I’m adding 75 grams seedless tamarind Now, to soak the tamarind, I’ve added hot water to it here Along with that, in another bowl, add 250 grams seedless dates & even dates are to be soaked in hot water Now, soak the tamarind & dates for minimum 15-20 minutes
2. After soaking, the tamarind & Now, transfer the soaked tamarind & dates in a mixer-grinder & make a fine paste of it, I’ve blended the tamarind & dates into a fine paste & the paste is looking good
3. Now, we have to strain this paste So, to strain, take a sieve & strain this paste properly Straining will help separate the fibrous parts of tamarind that we don’t need to add in the chutney as they spoil the texture of the chutney so I’ve strained the paste The fibrous strands of tamarind are out &
our fine, smooth paste is ready
4. Now, we have to add some more ingredients in the same vessel I’ve added 750 grams jaggery, Add salt as per taste, 1 tsp black salt, 1 tsp ginger powder, 1 tbsp Kashmiri red chilli powder, 1 tbsp cumin powder, & add 1 pinch of freshly crushed black pepper, along with that you have to add 1 litre water here
5. After adding water, mix all the ingredients well & now you have to dissolve the jaggery in this So, on high flame, while mixing, dissolve the jaggery well the jaggery will dissolve in 5-7 minutes at that stage, you have to bring this chutney to a boil
6. As soon as your chutney comes to a boil You have to lower the flame, Cook this chutney on medium low flame & keep cooking on a gentle simmer, You have to cook it for a minimum of 20-25 minutes, the more that you cook it, the better will your chutney be
7. Cooking for longer will help cook the jaggery really well & the chutney will get a rich dark colour too, & even the flavours will intensify quite a lot If you like, you can even cook for upto 45 minutes to 1 hour
8. But if you are cooking it for longer then you may have to add more water to it As while cooking, the water will evaporate & your chutney will continue to thicken You have to keep the thickness
of this chutney equal to that of sugar syrup just how the sugar syrup is, you have
to cook the chutney to a similar consistency,
9. Once you achieve that consistency, then you don’t need to cook the chutney any longer as it will continue to thicken as it cools down
10. Now my chutney has got the consistency of sugar syrup at this stage, I will stop cooking the chutney As soon as the chutney cools down, now it’s cooled down here it’s thickened quite a bit & achieved a perfect consistency Similarly, you have to cook the chutney too
11. After cooling down, you can store this chutney in an air-tight, clean container If you refrigerate it, it’ll easily last for upto a week For longer duration, it can stay for upto 3 or 4 or even 5 months if frozen in deep freezer
12. So, our sweet tamarind (Meethi) chutney is ready & how easy it is to prepare with really simple ingredients This chutney turns out lip-smackingly tasty,
While making this meethi chutney, a very common mistake done in many households is, is that they increase the quantity of tamarind quite a lot & it becomes a tangy & sweet chutney, & is quite acidic Actually, the acidity of tamarind, is just to balance the sweetness This chutney should be sweet in taste & the tanginess is just to balance the sweetness Flavour-wise, you have to keep this in mind Just use the same quantities that I have told you, & you will get an amazing meethi chutney
13. Now, next, let’s make the spicy green chutney
How To Make Green Chutney
14. Into a mixer-grinder, add 1 cup fresh coriander leaves, 1/2 cup fresh mint leaves, 1 inch ginger, 2-3 green chillies, 1 tbsp roasted chana daal, 1/2 tsp black salt (kala namak), 1 tsp cumin powder, 1 tsp dried mango powder, salt to taste, Here, I’m adding some ice cubes, & am adding very little water
15. Now, using a mixer-grinder, you have to nicely blend it into chutney, Whenever making green chutney, I add ice-cubes, By doing so, the heat generated by mixer by friction of the blades, So the ice-cubes help keep the chutney cooler, & this it retains the green colour, & hence your chutney will be vibrant green, So always keep this tip in mind
16.So you have to blend the chutney just until it’s nicely blended, Don’t over-blend it, even otherwise, the colour of the chutney will become dull
Sometimes, you all ask, how to maintain the vibrancy of, the colour of chutney, so keep these 2 things in mind
18. Now, I’ve blended the chutney, & the consistency of the chutney is perfect & colour is great too Our green spicy chutney is now ready, So now, both our chutneys are ready, & both chutneys turn out really well, make it in a similar way
Pro Tips
Remember that the green chutney, will add the spice element in your chaat, Keep it on the spicier side, Only then it can balance your meethi chutney well & you’ll get a riot of all flavours, sweet, spicy, tangy, in this Ragda Pattice, So keep this in mind
So the next step is that we have to make Ragda Pattice, So for Ragda Pattice, first of all I’m going to make Ragda here
How To Make Ragda
Prep for Ragda
19. Here, I’ve taken 250 grams white peas, meaning the dried white peas, I’ve washed them nicely & after washing them,I’ve soaked them in water for 8 hours, After 8 hours, your white peas will look somewhat like this, swelled up
20. Discard the remaining water & wash these soaked white peas properly, Keep that in mind, Now, I’m adding these soaked white peas in a pressure cooker, After adding them to a cooker, add water to it, Add water just 1 cm above the surface of the peas
21. Now, to this add 1/2 tsp turmeric powder, 1/2 tsp cumin powder, 1/2 tsp coriander powder, & add 1/2 tsp fennel powder, also, to this add salt to taste, After adding all the ingredients, mix everything well, and Cover it with the lid of pressure cooker & attach the whistle too
22. Now, I’ve left the peas to cook in the pressure cooker, In the pressure cooker, until the first whistle cook on high flame, It may take around 10 minutes for the first whistle on high flame, then, you will lower your flame to lowest, & then you have to cook upto two more whistles, It may take upto 3-4 whistles to cook these white peas
If you’ve soaked them well, then they’ll quickly cook & soften, You don’t need to worry a lot as
Ragda is slightly overcooked anyways, So, you don’t need to maintain the texture or shape of the peas, It’s ok if it overcooks a bit, If you don’t have a pressure cooker, then you can even boil it in a vessel, it might just take a lil longer
23. So, I’ve cooked these peas for 3 whistles in a pressure cooker, After cooking them, you have to let the pressure cooker depressurise naturally & let all the steam settle. & then lift the whistle valve to check if all the steam is released or settled only, after that, you have to open the pressure cooker, please keep that in mind.
24. Now, I’ve cooked the peas, so let’s see how the peas have cooked, Now, our peas are cooked well When you press these peas between your fingers, they should break apart, & our peas have cooked nicely
Now, we have to convert these cooked peas into a Ragda, Our Ragda is not ready yet, So to convert it into a Ragda, first let’s understand, why it is called a Ragda- coz basically it’s mashed, & thus the peas are then called Ragda (mashed peas), So we have to cook it further. It is quite a simple process
25. So let’s learn how to convert these peas into Ragda, Now for ease of demonstration, I’m transferring, these cooked peas into another large vessel. You can continue this process in a cooker if you want, Turn the stove on & bring these peas on a boil, Once your peas are on a gentle boil,
then at this stage, you have to mash the peas
26. Here, I’m using a potato masher, You have to mash the peas, slowly & gently, You have to keep in mind not to mash all the peas, Mash some peas & let some peas be intact & retain its actual shape, Now, ‘ve lightly mashed this Ragda & some peas are intact & the rest are mashed
27. Now, by doing this technique, there’s starch in the peas, which will help the Ragda thicken up nicely, Now, you have to cook this raga further for 5-7 minutes, Gradually, you’ll see that your ragda will thicken up
You Can Also Read This Wonderful recipe
Now, the ragda is of quite a nice consistency & quite thick, It will continue to thicken slowly with time, So, if your ragda gets too thick then, you can add some hot water to adjust it’s consistency, so, ere I’ve got the perfect consistency of the Ragda
28. At this stage, to this I’m adding julienned ginger to this & also I’m adding some fresh coriander leaves, Let’s quickly stir it one more time & here, our Ragda for Ragda Pattice is ready, So a really simple, Mumbai street style our Ragda is ready
Now, on streets of Mumbai, the Ragda is quite a simple preparation, There’s no tempering & very basic spices are added to it & it’s a very simplistic style Ragda, I know at certain snack vendors & homes, ragda is tempered But, this is how it’s made on the streets, so I’ve also kept the recipe simplistic
There’s one more thing on the streets of Mumbai, That there’s a filler ingredient added to the Ragda, The secret ingredient that is added is Potato, Now, why potatoes? As the peas are expensive & this, has to be thickened a lot, so potatoes are used as fillers, The starchiness of the potato helps thicken the Ragda really well
So, you may have seen that on a pan or a vessel, there’s thick Ragda, They take some of that, add some water, heat it & serve it, It has potatoes too, Now, since you are making it at home, no need to add the potatoes, Coz even peas have enough starch & that itself will help your ragda to thicken up, In fact if you prepare & store it, it’ll get set & while reheating you’ll have to add water, only then, the consistency of your ragda will be proper, Keep this in mind & while making it at home, no need to add potatoes as fillers, The starch in peas is enough to thicken the ragda
So our Ragda is ready. For next step, we have to make a simple Pattice (Tikki) for our Ragda Pattice
How To Make Pattice
Let’s prep for that
29. In a pan, add 1 tbsp oil & heat it a lil bit, Once the oil is hot, then add 1/2 tsp cumin seeds & add 1-2 finely chopped green chillies & I’m also adding to this boiled potatoes, Here, I had boiled 5-6 medium sized potatoes, I’m lightly mashing them & adding them to this, After adding the potatoes, add salt to taste to this, add a handful of freshly chopped green coriander leaves, Now, to this I’m adding 1/2 inch grated ginger
30. So nicely grate this ginger & add that ginger paste to this mixture, Now after adding all the ingredients, take a potato masher, Using a potato masher, you have to mix everything together & lightly mash the potatoes as well, You have to be careful not to make a paste, Just mash it lightly
31. So that everything is incorporated well & big lumps are broken down, Do just that, Now, I’m just stirring this on a high flame for 2-3 minutes, To cook this potato mixture, By doing so, the excess moisture will evaporate, & it’ll be easier for you to shape the tikkis, So here, our potato mixture is ready, Now, transfer it to a bowl
32. After transferring it to a bowl, let it cool down completely, Now, I’ve made the potato mixture for the pattice & I’ve let it cool down, It is imperative to cool the mixture down, to let it settle before making the tikkis. You job of making the tikkis will become simpler & the pattice will be shaped easily
Now keep one thing in mind for this, is to try & use the potatoes with lesser starch content. Don’t use the yellow potatoes Don’t use the sweeter variety either Otherwise the pattice will become lacy as it might have too much moisture in it It could be possible that the potatoes, that you are using have more moisture & starch in them. At that stage, if you think so then add some soaked poha to it, Take the poha (rice flakes), wash them with water, let it rest for 5 minutes, mash it & add to this. It will act as your binding agent. If you don’t want to add that, then take our white bread & mash it & add to this. Sprinkle some water on the bread, then mash it & add to this mixture. So that it will give a good binding to this mixture.
Today, my potatoes are absolutely perfect, so I’m not adding any binding agent to it. These pattice will turn out nice just as is. So now the potato mixture is cooled down well
Make Potato Patties
33. So let’s make tikkis/pattice out of this & then I’ll tell you how to fry them. So take a spoonful of mixture in your hand & give it a round shape. I’ve formed a round shape out of this Now gently pat it to form into a disc or a tikki/pattice. I’ve made a nice medium sized pattice here Just like this, you can shape all the pattices all together, & place them in a plate.
34. So I’ve shaped & prepared all the pattices. Now, it’s time to fry them.
How To Fry Pattices
35. I’ve taken a pan here & I’m adding desi ghee (clarified butter) to it. Do fry the pattice in desi ghee for best results & excellent flavour. Once your ghee is nice & hot, then add pattice to it. Don’t add pattice to cold pan, otherwise it’ll break apart & not fry well. Now, you have to slowly fry the pattice on both sides. Keep the flame on medium & fry them slowly
36. Once your pattice is golden brown on one side, then flip it & fry it on the other side slowly.Now, that I’ve fried, the pattice very well from both sides. & my pattice for Ragda Pattice is ready. So pattice we’ve fried now, & next step is just to plate them
Assemble and Make Ragda Pattice
While making pattice for Ragda Pattice keep one thing in mind, You’re not trying to make the Aloo Tikki chat type crispy, crunchy, potato tikkis here. The pattice for Ragda pattice is soft & roasted from just top & bottom. & let it be soft. That’s how it tastes the best & how it’s served on Mumbai streets. It’s not the crispy Aloo Tikki, so don’t try to make that, The process for that is quite different, So the process to make pattice is easy & simple, In some places in Mumbai, you may have seen a yellow, coloured patty, so the difference is just addition of turmeric. So if you want a yellow patty, add a pinch of turmeric & you will have a yellow patty.
So it was so simple to make, Ragda & Pattice with simple ingredients. All components are ready,
so let’s assemble & plate the and serve this ragda pattice
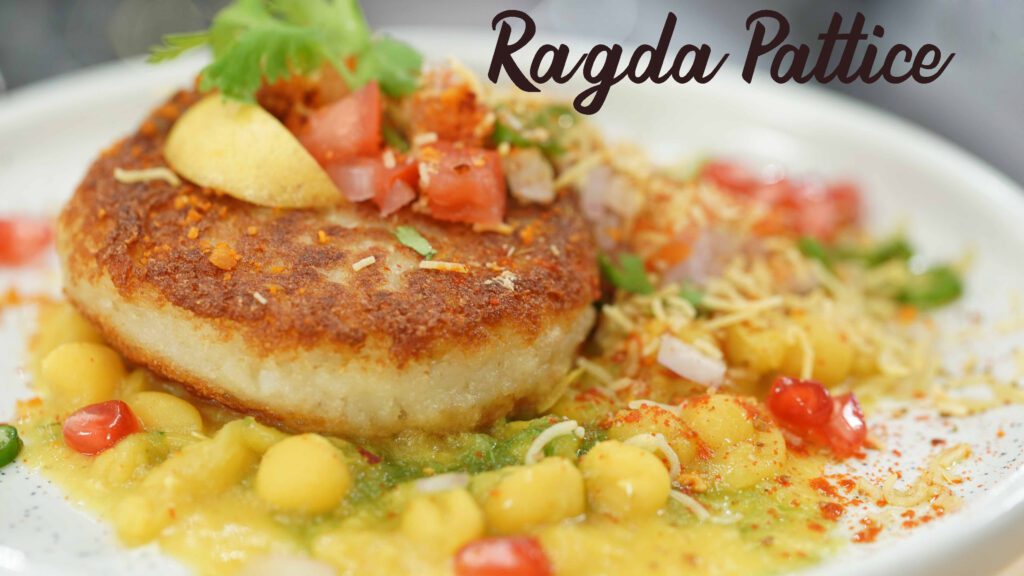
So our Ragda Pattice is served & it’s turned out absolutely stunning. So Definitely try this recipe & I’m sure you’re gonna love it. So try it & tell me in the comments section, how did you like this recipe. Share this recipe with your friends & family, Hit the subscribe button if you’ve liked this recipe.
Have an amazing time with my Ragda Pattice recipe at your home. Cheers!